DIY: Power Supply Modification Guide


This is also a sharing of experience in modifying power supplies, not only the experience of modifying a 60V 50A power supply, but also the following modification experience and steps if you want to carry out modifications.
Tools needed: The tools needed are not much different from before. Of course, an electric soldering iron and a soldering station with higher power are preferable. High-quality solder wire and rosin flux are also required. Only use rosin flux, other fluxes such as soldering oil will conduct electricity, causing circuit parameters to become unstable, and the cause cannot be identified. You will need a pair of pointed-nose pliers, a cross screwdriver, another pair of pointed-nose pliers, a desoldering pump, and the skills to solder components that are as small as sesame seeds onto the circuit board.
Next is the experience and precautions for the 120V 25A modification scheme:
① Disassembling the power supply: It is the same as the modification scheme for the 60V 50A power supply. When disassembling the power supply, do not use too much force to remove the screws. Be gentle when removing the EMI filter board and the control board. There are two fixing screws on the control board, and there are plug-ins underneath. After removing the screws, gently shake the board upwards to easily remove it. Don't use too much force and damage the plug-ins or the board.
(Precaution: Do not use tools such as pliers to disassemble it. Use your hands directly. Tools like pliers may damage the components or wiring on the circuit board, causing more harm than good.)
②Disassemble and control the components on the small board as well as the soldering: This is the same as the 60V 50A modification scheme shown above.
③Disassemble the capacitors and transformer:
(1) Full bridge rectification scheme: Set the soldering iron temperature to the highest level. If the power is relatively large, directly heat the pins of the transformer from the bottom of the circuit board. Then, use the small hook made in the modification tutorial to pull the middle pin away from the board surface. Afterwards, add some solder on top of its corner to ensure reliable connection between the four copper plates without any layering.
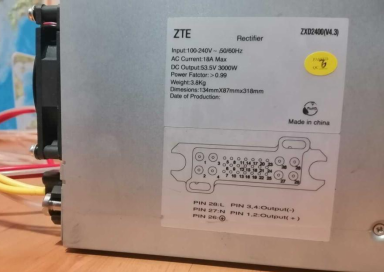
(2) Full wave rectification scheme: This is relatively difficult and requires the entire transformer to be removed. The four copper plates of its middle pin are two on top and two on the bottom. After separating these two groups, add solder on top of each group to ensure reliable connection between each group. Then, cover each group with thick heat shrink tubing as much as possible. After that, remove the wires from the first and third pins of the transformer's secondary, parallel them together, and weld them in a position just above the original center tap. When installing the transformer back onto the main board, the two parallel wires will replace the center tap. During welding, make sure to weld the two wires together at the center tap position on the main board and ensure all other pins are also welded firmly. When replacing the capacitors, most of them need to be replaced because the original ones are rated for 63V and if you change it to 120V without replacing them, they will explode. When replacing them, make sure to confirm the polarity of the capacitors multiple times and never solder them in reverse, or they will also explode. If you want to fully rectify, you also need to replace diodes and other components.
④Rectification method:
(1) Full bridge rectification: When adding the diode, make sure to keep its pins away from the main board. When welding it with the two diodes originally installed on the machine, be careful not to touch other pins. After welding, use a multimeter to measure and ensure that there is no short circuit. Then, use insulating material such as green paper to insulate between the main board and the two added diodes. Do not let the added copper wire touch the copper wire below it or the clip of the voltage regulator.
(2) Full wave rectification: This is relatively simple. When replacing the original machine's diode, set the soldering iron temperature a bit higher, and after welding, check that the pins are not stuck together. Then, just ensure the position is correct.
Precautions and experience for opening holes in the front panel and installing the rear tail plate: This is similar to the above, but because the current is only 25A, a six-square wire is enough and there is no need to use too thick wires.