Enhance your keyboard experience with this comprehensive do-it-yourself (DIY) guide. We'll explore the challenges associated with wired and wireless keyboards, providing insights into overcoming common issues. Logitech, a reputable brand, offers wireless keyboards with exceptional performance, especially those featuring Unifying technology.
1、Logitech's Wireless Keyboards
Logitech offers the G613 wireless mechanical keyboard, but it might not be suitable for everyday use if you dislike the extra G keys on the left and find switching switches inconvenient. In that case, you can DIY one.
2、Crafting Your Customized Keyboard
One option is to use an existing mechanical keyboard, add a Logitech keyboard controller (commonly used ones are K230, K375S, K270), but this requires handling additional wiring. The second option is to use a readily available PCB board for direct soldering, and this text focuses on the latter.
3、Materials Needed:
Materials needed: PCB + K270 controller + Kaihua mechanical keyboard shell + keycaps + CR2032 battery holder + 4 CR2032 batteries (everything except the switches). The appearance of the keyboard is as shown in the picture.

4、Step-by-Step Assembly Process
The controller is already soldered onto the PCB and installed. Solder the switches onto the PCB as shown in the picture. The two flying wires are necessary because the PCB has eliminated the keyboard indicator points, so flying wires are needed to connect the indicator lights. Of course, you can also buy pre-soldered products.

5、Power Optimization
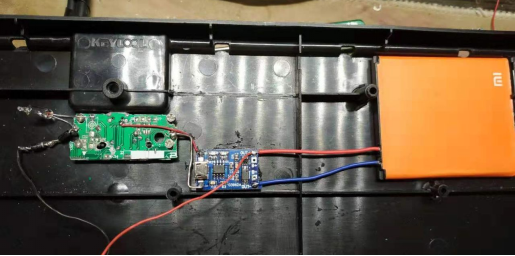
The keyboard has a battery holder, and four CR2032 batteries are installed. To extend the lifespan, you can switch to lithium batteries. Materials needed: a spare Xiaomi phone battery with around 1800mAh capacity, a 4056 charging board, and a disassembled game controller with a PCB and a MicroUSB socket. The reason for using this socket is to screw it onto the keyboard; otherwise, hot glue can secure the 4056 board. The battery outputs 3-4.2V, and after connecting a diode in series, the output voltage is 2.4-3.6V. With an estimated four-year lifespan per charge, most of the power is used by the battery itself, and Unifying is very power-efficient. Additionally, a mercury switch is added. Its purpose is not to save power by turning off the keyboard but to shut down and restart when initially pairing with the Unifying adapter. You can choose to include or omit this switch, as long as you pair it beforehand. To turn off the keyboard, just stand it upright. The PCB has four rarely used buttons that can be short-circuited based on personal needs to change their functions. The default functions are retained here, only changing one FN key that is not used into a calculator shortcut.

6、Extended Lifespan
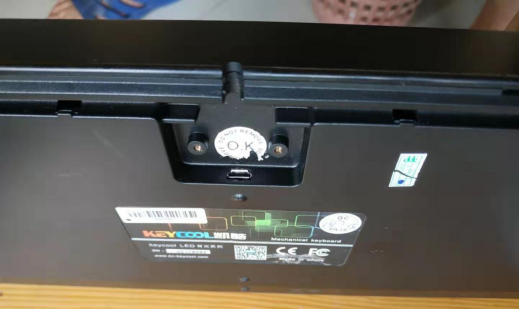
This is the charging port, and it's expected that it will be plugged in only a few times during the keyboard's lifespan. After all, charging it once can provide several years of use. The keyboard feels excellent, and there's no discernible difference from using a wired keyboard.

Conclusion:
Elevate your keyboard experience with this comprehensive DIY guide, combining Logitech's cutting-edge technology with your customization preferences. Enjoy a high-performance, wireless keyboard that rivals its wired counterparts.


