
If there Explore the world of DIY keyboard modification with our detailed guide, focusing on material selection, step-by-step instructions, and testing for optimal performance. Uncover valuable insights into backlighting, keyboard modification, Logitech Unifying control, switches, power supply, and more.
I. Material Selection for DIY Keyboards:
When embarking on a DIY keyboard project, consider the following key aspects:
1. Backlighting Optimization:
· Enhance backlight brightness by carefully choosing between surface-mount and through-hole LEDs.
· Mitigate power consumption concerns by selecting appropriate LED types.
· Discover a novel solution for hot-swapping light beads using 1mm-diameter hollow rivets.
2. Keyboard Modification:
· Opt for a plastic-backed, wireless-compatible keyboard to avoid signal interference.
· Leverage existing LED circuits in keyboards for seamless modification, with a preference for DAREU keyboards.
· Tailor the modification process to accommodate Logitech Unifying controls, ensuring functionality without FN key complications.
3. Logitech Unifying Control:
· Select the K270 Unifying version for an uncomplicated modification process, offering a standard 104-key layout without FN key combinations.
· Capitalize on the absence of FN keys for a streamlined user experience, with added benefits like a caps lock indicator.
4. Switches:
· Choose Kailh Blue switches for their tactile feel and built-in sockets, simplifying the soldering process.
· Enable easy switch replacement by utilizing the self-contained sockets.
5. Power Supply:
· Implement an external battery solution using 18650 cells for extended usage.
· Employ the Miller 101 charger as a compact and high-quality battery holder with built-in battery level indicators.
6. Switch Control:
· Optimize power consumption with Logitech Unifying controls, eliminating the need for an off switch.
· Integrate a TTP223 touch switch for convenient and effective light control.
II. DIY Process:
Follow our step-by-step guide to transform your keyboard into a customized masterpiece:
1. Cleaning and Disassembly:
· Ensure a clean slate by disassembling the keyboard and meticulously cleaning its components.
· Soak keyboard parts in soapy water, use a brush for thorough cleaning, and air-dry before proceeding.
2. Switch and LED Removal:
· Carefully desolder switches and LEDs, preparing the keyboard for the modification process.
3. Miller Charger Installation:
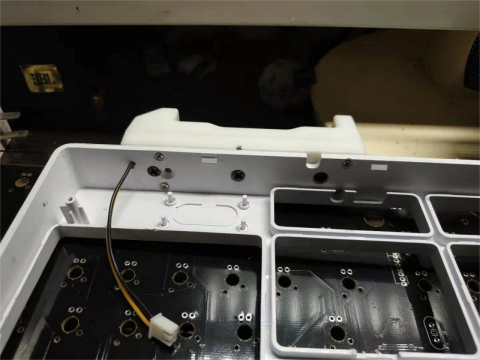
· Securely install the Miller 101 charger into the keyboard shell, adhering to specific height requirements for screw placement.
4. Mainboard Modification:
· Cut the copper foils leading out from each switch on the mainboard.
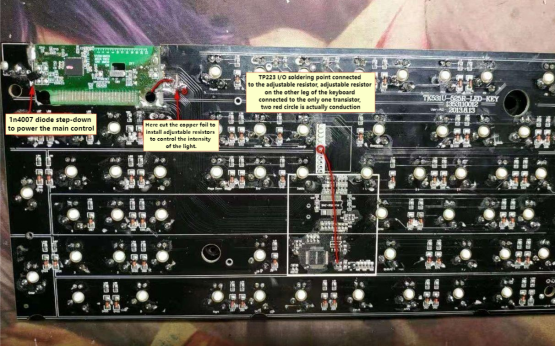
· Remove unnecessary components from the PCB, especially the previous control chip. Leave only the transistor on the mainboard and one current-limiting resistor for each LED chain.
· Cut out a piece from the top right corner of the PCB to install the Logitech K270 Unifying control. Use solder to secure it to the keyboard PCB.
5. Lighting Control Installation:
· Install the lighting control. Since the keyboard has transistors for LED control, add a switch in front of each transistor. Use a TTP223 touch switch, connecting its GND and ACC to the positive and negative of the battery, respectively. Connect I/O to the transistor with a resistor to control the brightness.
6. Hollow Rivet Integration:
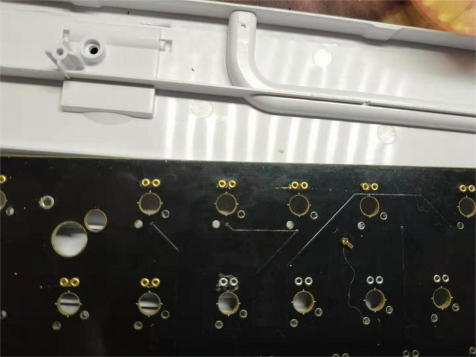
· Insert hollow rivets into the PCB's light holes and secure them with double-sided tape, allowing for easy LED replacement.
7. Switch Soldering:
· Solder Kailh Blue switches onto the PCB, taking advantage of their self-contained sockets for straightforward switch replacement.
8. Wiring with Power Frequency Transformer:
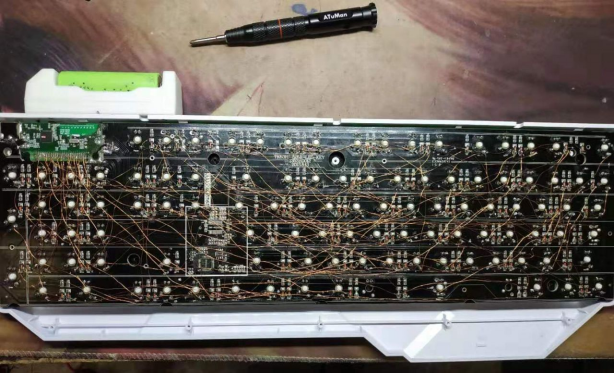
· Utilize the primary coil of a power frequency transformer for wiring purposes.
9. Testing and Troubleshooting:
· Test the trigger of the buttons during soldering to address issues like unmelted enamel on wires or soldering errors.
10. LED Configuration:
· Handle the remaining four LEDs. Connect the caps lock indicator directly to the Logitech control and refer to the surrounding circuit for the other three indicators.
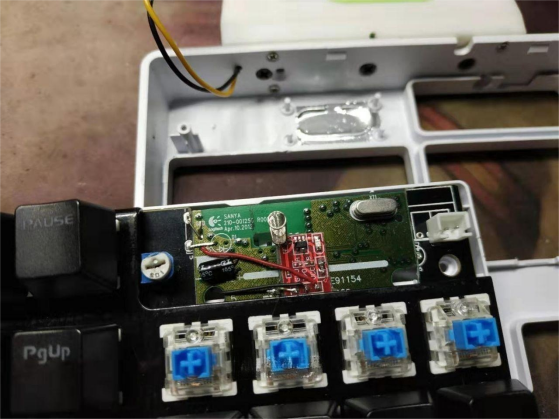
11. Touch Switch Optimization:
· Scrape off the copper foil leading to the back of the TTP223 touch switch. Attach a spring (removable from a switch) inside the switch and affix a small piece of aluminum foil tape to the other side of the keyboard to prevent accidental touches.
· Insert all LEDs into the hollow rivets, preferably replacing the yellow LEDs with high-brightness, low-power green LEDs.
12. Final Assembly:
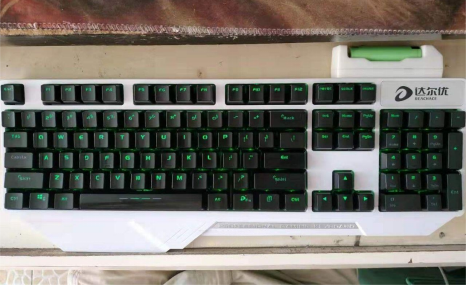
· Reassemble everything, and the DIY process is complete. The keyboard's lights can be controlled by hovering a finger about 1 centimeter above the keyboard logo, a highly successful modification.
13. Conclusion and Testing:
· Firstly, conduct a power consumption test. If the lights are off, a single 18650 battery is sufficient for over 5 years of use. The keyboard has extremely low power consumption, and a few hundred mAh battery can last one or two years. In actual testing, the DAREU keyboard with green LEDs has high brightness, requiring very low current to light up all 104 LEDs – only 10.4mA. If the keyboard brightness is adjusted to regular use levels, the entire keyboard consumes only 10.4mA (tested at a battery voltage of 3.82V), allowing for approximately 300 hours of continuous use on one battery. Even with the lights on for 5 hours a day, the keyboard only needs to be charged once every two months, and further reduction of brightness would decrease the current.
III. Advantages and Disadvantages:
1. Advantages:
· Low power consumption for extended battery life.
· Low latency in Logitech Unifying wireless connection, providing a wired keyboard feel.
· Mechanical keyboard with plug-and-play switches.
· Dual functionality as both a keyboard and a charger.
· Touch-sensitive light switch for enhanced aesthetics.
· Unobtrusive placement of controls for minimal interference with wireless signals.
2. Disadvantages:
· Potential issues with LED contact in plug-and-play switches, mitigated by simple adjustments.
· External battery configuration may be considered a limitation.
Experience the satisfaction of a customized and optimized keyboard with our comprehensive DIY guide. Unleash your creativity and technical skills to create a keyboard that combines functionality with a sleek design.


